デザインルールは特定のオブジェクトを対象とし、階層的な方法で適用されます。例えば、ボード全体に適用されるクリアランスルールがあり、次にネットのクラスに適用されるクリアランスルールがあり、さらにそのクラスのパッドの1つに適用される別のルールがあるかもしれません。ルールの優先順位とスコープを使用して、PCBエディタはデザイン内の各オブジェクトにどのルールが適用されるかを判断することができます。
明確に定義された一連の設計ルールにより、さまざまな厳しい設計要件を持つ基板設計を正常に完了できます。さらに、PCBエディタはルール駆動型であるため、設計の最初に時間をかけてルールを設定することで、ルールシステムが成功を確実にするために懸命に働いていることを知って、安全に設計の作業を効果的に進めることができます。
このソフトウェアのPCBエディターに組み込まれたルールシステムには、他のPCB編集環境で使用されている設計ルールシステムとは異なるいくつかの基本的な特徴があります:
デフォルトの設計ルール
新しいPCBドキュメントが作成されると、デザインルールチェックシステムの正しい機能のために存在しなければならないいくつかのデフォルトルールが含まれています。デフォルトルールが削除された場合、PCB Rules and Constraints Editorを閉じると自動的に再作成されます。使用したくない設計ルールがある場合、これらのルールを管理する正しいアプローチは、それらを無効にすることです。
ルールを無効にするには、PCB Rules and Constraints Editorダイアログの右側にある要約リストのいずれかで、そのルールの対応する有効オプションを切り替えます。無効にされたルールは「グレーアウト」表示されます。設計ルールの無効化についてもっと学びましょう。
 必要ないルールを無効にするには、Enableオプションを使用します。無効にされたルールは「グレーアウト」表示されます。
デフォルトのルール値は内部的にミルで定義されており、設計に適さない値を持つことがあります。独自のデフォルトルールと値を使用するには、以下の方法があります:
新しいルールの作成
PCB Rules and Constraints Editorダイアログ内から新しい設計ルールを追加するには、左側のツリー内で必要なルールタイプをナビゲートして選択し、ルール要約リストの下にあるNew Rule ボタンをクリックするか、必要なルールタイプを右クリックしてコンテキストメニューからNew Rule を選択します。
新しいルールはフォルダツリーに追加され、そのルールタイプの要約リストにも表示されます。

新しいPCB設計ルールの作成例。
新しいルールが追加されると、最初はそのルールの特定のタイプに基づいてデフォルト名が付けられます。その名前のルールが既に存在する場合は、数値の接尾辞が付けられた名前(例:Width_1、Width_2など)が付けられます。
ルールのスコープと制約属性にアクセスするには、フォルダーツリーペインでそのルールのエントリをクリックするか、要約リストのエントリをダブルクリックします。ダイアログのメイン編集ウィンドウが変更され、そのルールのスコープと制約属性を定義するためのコントロールにアクセスできるようになります。

ルールの詳細な制御、範囲および制約にアクセスする。
新しいルールを完全に定義するには:
- ルールにわかりやすい名前を付けて、識別できるようにします。
- ドロップダウンからスコープオプションを選択するか、クエリ(またはバイナリルールのクエリ)を入力して、ルールの範囲を定義します。
- ルールの制約を設定します。
- ルールの優先度を設定します。
ルールウィザードを使用して新しいルールを作成する
新しいルールは、デザインルールウィザードを使用して作成することもできます。Design » Rule Wizardコマンドを直接使用するか、PCB Rules and Constraints Editorダイアログの下部にあるRule Wizardボタンをクリックしてアクセスします。
ウィザードのページを使用して新しいデザインルールを作成します。手順は以下の通りです:
- 必要なルールタイプを選択し、わかりやすい名前を付けます(必要に応じてコメントも付けます)。
- ルールの範囲を定義します。ウィザードに組み込まれているQuery Builderの実現を通じて、スコープをさらに強化する機会があります。
- ルールの優先度を設定します。
Launch main design rules dialogオプションがウィザードの最後のページで有効になっている場合、FinishボタンをクリックするとPCB Rules and Constraints Editorダイアログが開きます。このダイアログを使用して、新しく作成したルールの制約を編集できます。

ルール作成を効率化するためにDesign Rule Wizardを使用します。
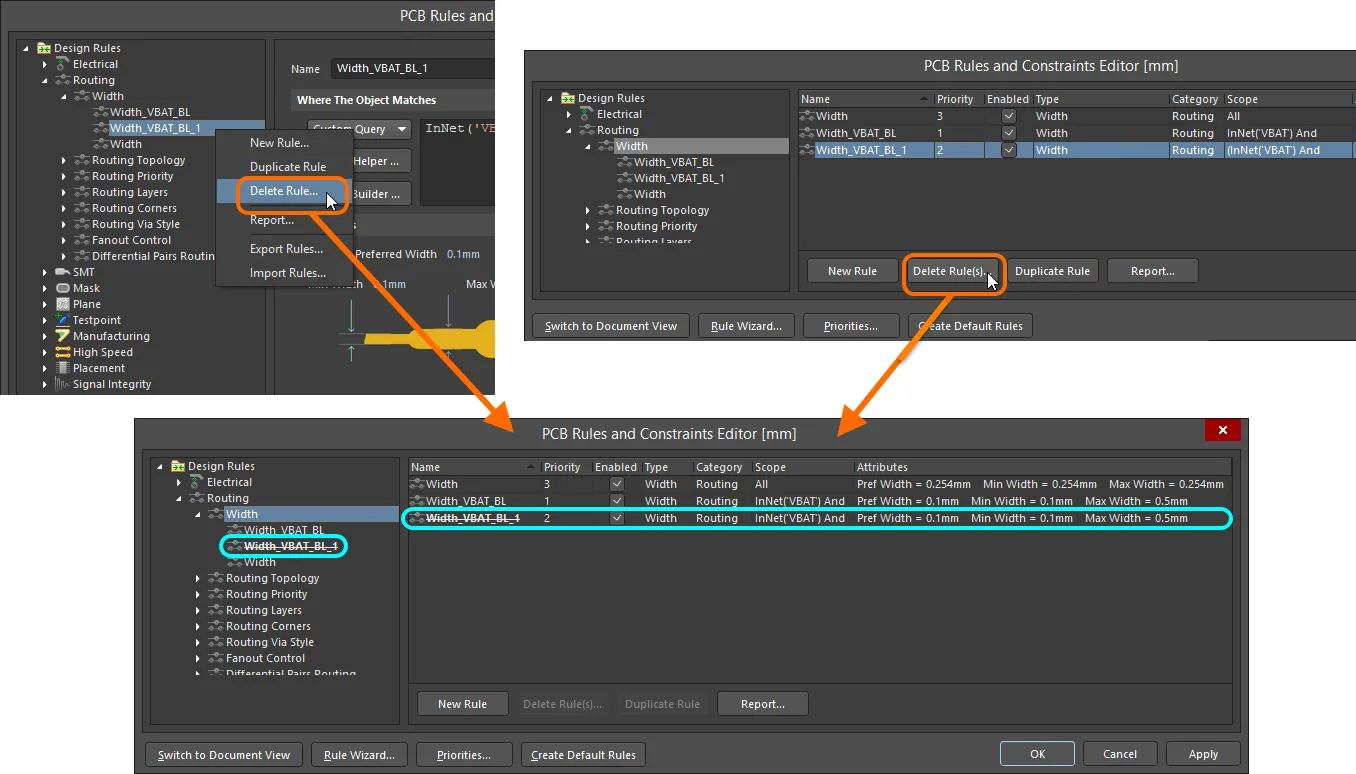
既存のルールの複製
既存のルールの同一コピーを迅速に作成するには、複製機能を使用します。この機能には2つの方法でアクセスできます:
- 左側のツリーを使用して必要な既存のルールに移動し、右クリックしてコンテキスト メニューから Duplicate Ruleを選択します。
- 左側のツリーで特定のルールタイプに移動し、右側の概要リストで複製するルールを選択して、リストの下にあるDuplicate Ruleボタンをクリックします。
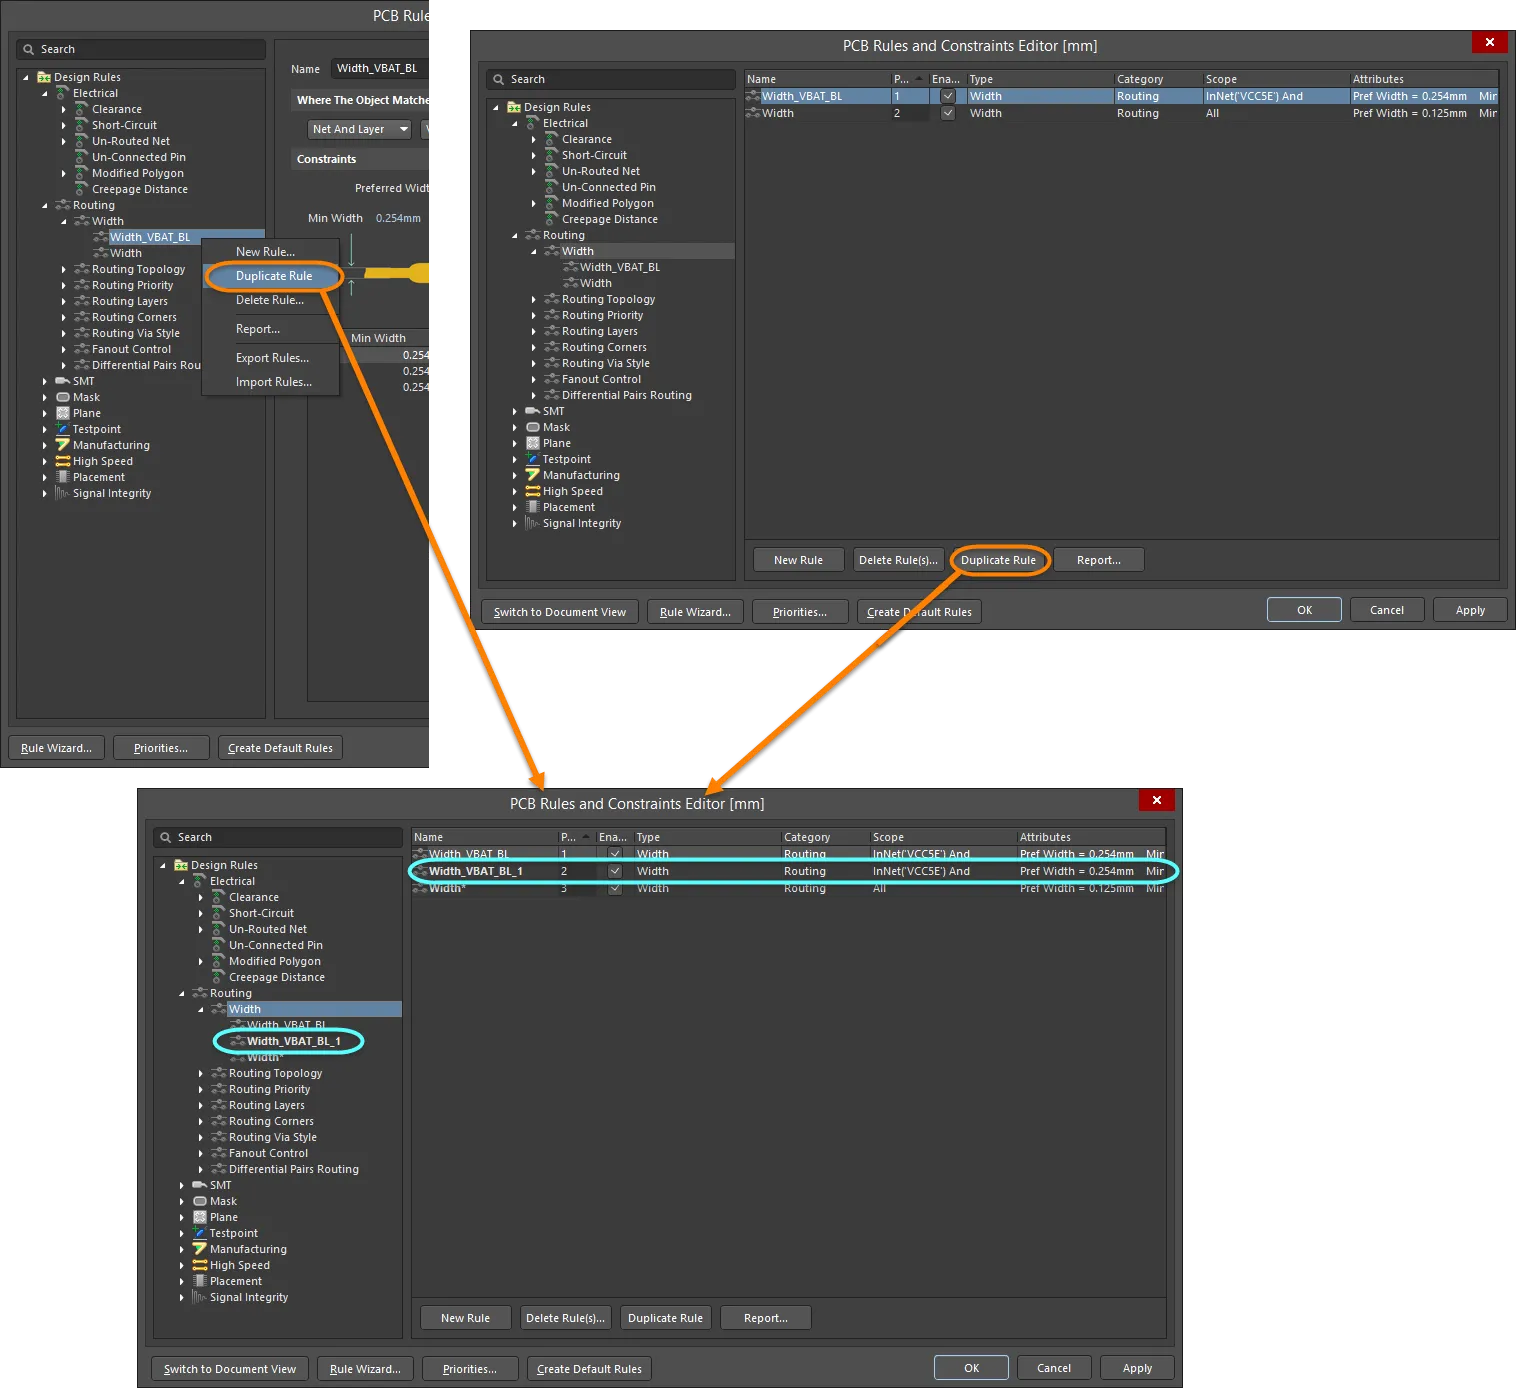
ルール複製機能を使用して、類似のルールの作成を効率化します。
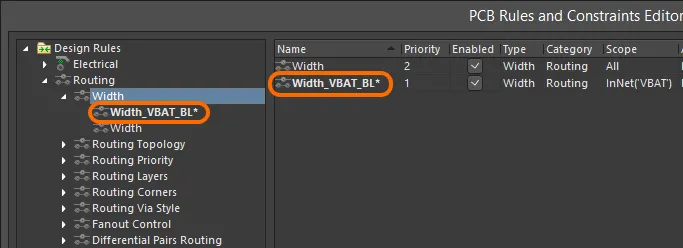
重複ルールは、元のルールと同じ名前で、区別するための接尾辞(例:_1)が追加されます。その定義(範囲、制約など)は元のルールと同一です。優先度に関しては、元のルールの直下の優先度が与えられます。例えば、元のルールの優先度が1であれば、重複するルールには優先度2が与えられます。
PCB Filterパネルからルールを作成する
設計ルールは特定の設計オブジェクト群に適用される範囲で定義されるため、まずそれらのオブジェクトを特定してから、それらを対象とする設計ルールを作成する方が簡単(そして速い)ことがあります。PCB Filterパネルは、パネル内で現在定義されているクエリ式を使用してその範囲を使用する設計ルールを作成する機能を提供します。したがって、クエリ式が何を対象とするかを視覚化しようと苦労するよりも、PCB Filterパネルを使用してクエリ式をテストおよび調整し、必要なオブジェクトのみがフィルタリングされるまで行います。そのクエリ式を使用してルールを作成することで、正しいオブジェクトのセットを対象としていることが保証されます。
新しい設計ルールを追加するには:
- Create Ruleボタンをクリックします。Choose Design Rule Typeダイアログが表示されます。このダイアログには、PCB 文書で使用可能な各規則カテゴリーおよび規則タイプがリストされます。
- 作成するルールのタイプを選択し、OKをクリックします(またはエントリを直接ダブルクリックします)。
- PCB Rules and Constraints Editorダイアログが表示されます。選択したタイプのルールが作成され、ルールのメイン編集ウィンドウが表示され、ルールの特定の制約を定義する準備が整います。ルールのスコープオプションがCustom Queryに設定され、PCB Filterパネルのクエリ式がそれに応じてクエリ領域に入力されます。
- 必要に応じて、ルールの名前と制約を変更します。また、必要に応じて優先度を変更します(デフォルトでは最高の優先度が与えられます)。
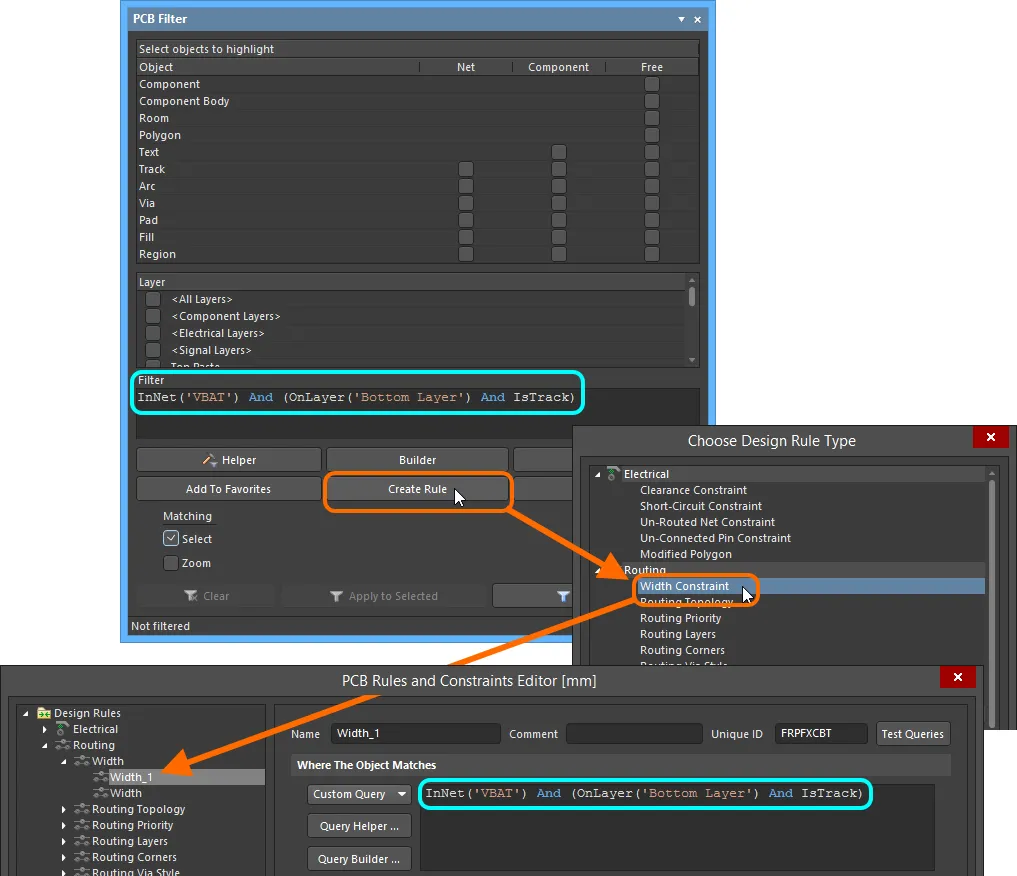
新しい設計ルールをPCB Filterパネルから直接作成する - フィルタークエリ式がルールの範囲として使用されます。
過去のクエリ式の再利用
時間が経つにつれて、様々なボードのレイアウトを行う過程で、多くの便利なクエリ表現が構築されます。通常、同じデザインだけでなく、異なるデザインにおいても、同じクエリを適用し、再適用したいと思うでしょう。これを可能にするために、PCB FilterパネルはHistorical and Favoriteクエリの概念をサポートしています。
パネルからクエリが入力され、適用されると、そのクエリはクエリの「履歴リスト」に追加されます。さらに、そのクエリはAdd To Favoritesボタンをクリックすることで、クエリの「お気に入りリスト」に追加することができます。HistoryおよびFavoritesボタンをパネルで使用して、Expression Managerダイアログ内の同名のタブにアクセスし、これらのリストを表示します。
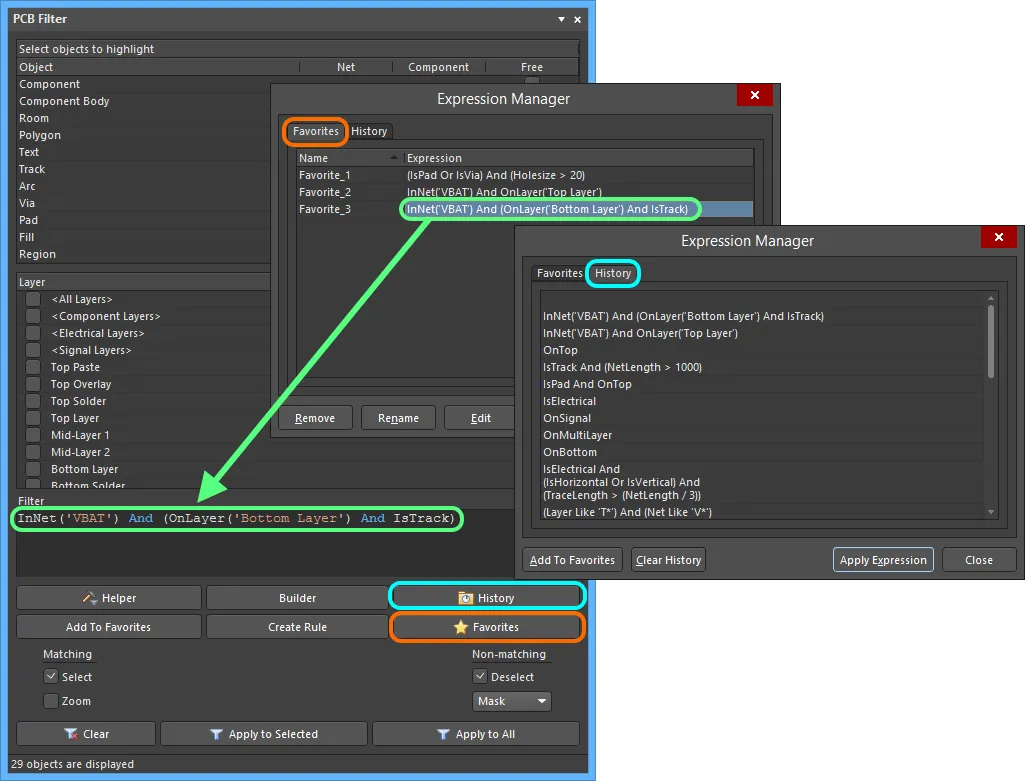
適用されたクエリ式の履歴にアクセスし、何度も再利用するお気に入りの式のリストを作成します。
リスト内の式を使用するには、そのエントリーをダブルクリックするか、エントリーを選択して Apply Expressionボタンをクリックします。式マネージャーダイアログが閉じ、式がPCB FilterパネルのFilter領域に読み込まれます。
この機能により、必要なスコープを持つルールの作成が合理化され(そして加速され)、過去のお気に入りのクエリ式を取得し、それがまだ必要なオブジェクトセットを対象としているかを確認(フィルタを適用)し、その式をスコーピングに利用するルールを作成します。前のセクションで詳述されています。
デザインルールのスコーピング
Altium DesignerのPCBエディタは、ルール駆動型の環境です。デザイン要件は、ボードの制約を定義する一連の明確に定義されたデザインルールを通じて強制されます。デザインルールは、デザイン内の特定のオブジェクトを対象とします。PCBルールシステムが、特定のルールがどのオブジェクトに適用されるかを知るためには、そのルールのスコープ、つまりその適用範囲を知る必要があります。スコーピング、またはルールの対象を定めることは、PCB Rules and Constraints Editorダイアログで行われます。
デフォルトの設計ルール、または追加された新しいルールは、デフォルトのルール範囲がAllに設定されており、これはボード上のすべてのオブジェクトに適用されることを意味します。ドロップダウンを使用すると、簡単なルール範囲をすぐに設定できます。 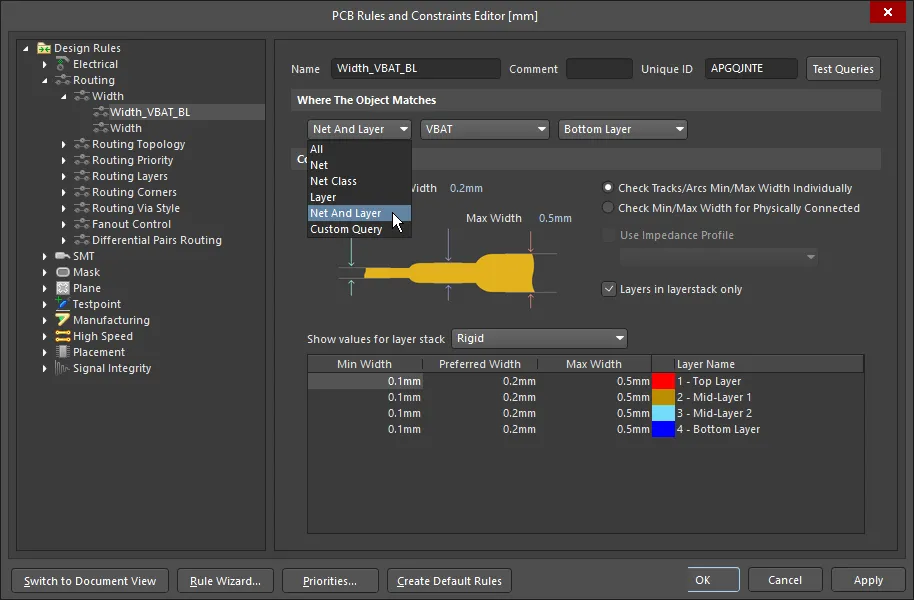
設計オブジェクトへの適用を定義するために、設計ルールの範囲を設定します。
事前に定義された可能なターゲットオプションのリストに制限されるのではなく、各設計ルールはいわゆるQueryを記述することによって、より厳密に範囲を設定することができます。
クエリを入力するには、最初のWhere the Object MatchesドロップダウンをCustom Queryに設定します。これにより、現在のドロップダウン設定に基づいてこのルールのルールエンジンが使用しているクエリが表示されます。
クエリは、基本的には対象となる設計オブジェクトのセットを定義するソフトウェアへの指示です。クエリはクエリキーワードを使用して記述されます。特定のオブジェクトセットを見つけるためにフィルターパネルでクエリを書くのと同じように、各ルールが対象とするオブジェクトを定義するためにクエリを書くこともできます。例えば以下のようになります:
InNet('VBAT') And OnLayer('Bottom Layer')
このクエリが幅のルールの範囲として使用される場合、VBATネットをルーティングしてボトムレイヤーに切り替えると、トラックの幅がそのルールの制約として指定された幅に自動的に変更されます。また、設計ルールチェックを実行すると、ボトムレイヤー上のVBATネットのルーティングは指定された幅でなければ違反としてフラグが立てられます。
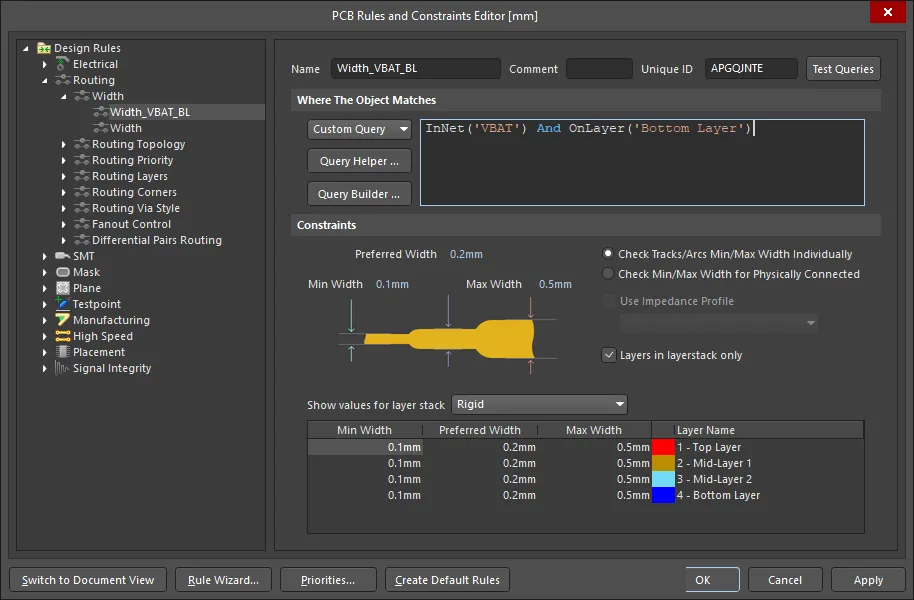
ルールの範囲指定はクエリシステムに基づいています。カスタムクエリオプションを使用して現在のクエリを表示し、必要に応じてクエリキーワードを使用して変更します。
ルールが単項か二項かによって、それぞれ一つまたは二つの範囲を定義する必要があります。
PCBコンポーネントの指定子やポリゴン名に変更が加えられた場合、カスタムクエリを使用する設計ルール内の参照は自動的に更新されます。設計ルール内のPCBコンポーネント指定子を参照するクエリは、指定子が再注釈されたり、ECOによって更新されたり、ボード上で手動で編集されたりしたときに変更されます。
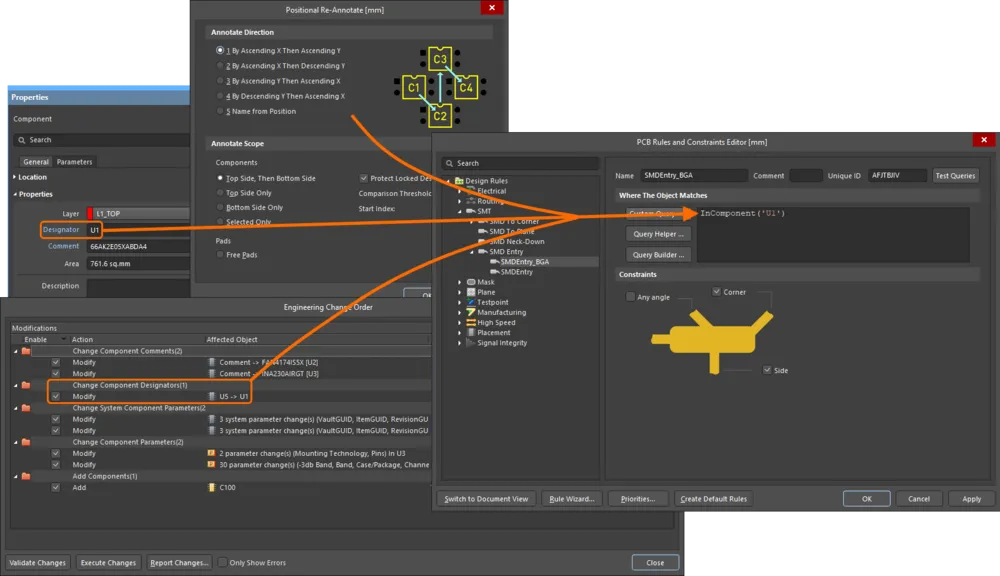
コンポーネント指定子が変更されたときにルールクエリを更新する機能は、 Advanced SettingsダイアログでPCB.Rules.UpdateQueryOnComponentDesignatorChangeオプションが有効になっている場合に利用できます。
クエリに構文エラーがある場合、そのルールは無効とみなされ、PCB Rules and Constraints Editorダイアログの左側のルールツリーと、ルールが表示される任意のサマリービュー(ルールカテゴリまたはルールタイプ)で赤く強調表示されます。さらに、ルールタイプとルールカテゴリのテキストも左側のルールツリーで赤く表示されます。そのため、無効なルールを含むルールツリーのエリアを折りたたんでいても、階層の上位レベルでそれに気づかされます。ダイアログを閉じようとすると、警告メッセージも表示されます。構文エラーがあるルールスコープは、オンラインおよびバッチDRC分析プロセスを大幅に遅くする可能性があります。構文的に正しくないルールスコープは必ず解決してください。
スコーピングオプション
簡単なスコーピングオプションが提供されており、迅速にスコープクエリを生成できます。最初のドロップダウンフィールドから1つのオプションを選択し、必要に応じて、次のドロップダウンリストを使用して適切なターゲット(ネット、レイヤー、フットプリント、パッケージなど)を選択します。提示されるスコーピングオプションは、ルールタイプに応じて焦点が当てられています。

簡単なスコーピングオプションを使用して、迅速にクエリを作成します。
シンプルなスコーピングオプションを使用してルールをスコープすると、クエリが作成されます。最初のドロップダウンフィールドでCustom Queryを選択すると、クエリが表示されます。
Custom Queryオプションを使用すると、より複雑であるがより具体的なクエリを自分で書くことができます。ルールスコープのための自分の特定のクエリを、右側のクエリ領域に直接入力できます。また、論理的なクエリ式の作成を支援するための2つの機能が利用可能です。それらはクエリビルダーとクエリヘルパーです。クエリの構文や利用可能なキーワードが不明な場合に役立ちます。

より複雑なクエリ式を作成するためにカスタムクエリオプションを使用します。
クエリビルダーは、関連する「ビルディングブロック」を使用してのみ構築できる、敏感な条件タイプと値を使用してクエリを構築するよりシンプルな方法です。完全なキーワード指定と演算子構文を使用した高度なクエリ構築には、クエリヘルパーを使用してください。
クエリビルダーを使用したルールのスコーピング
 ボタンをクリックして、Building Query from Boardダイアログを開きます。これにより、条件文のシンプルな構築によって、設計文書内の特定のオブジェクトをターゲットにするためのクエリを作成できます。
ダイアログの左側のセクションは、必要なオブジェクトのセットをターゲットにするために必要な条件を指定するために使用されます。各条件は条件タイプと条件値で構成されます。これらのドロップダウンフィールドは、現在のルールタイプのスコープを構築するのに関連するエントリーで、選択された条件タイプの値でそれぞれ満たされます。
条件が定義されると、ダイアログの右側のセクションに現在構築されているクエリのプレビューが表示されます。条件はANDおよび/またはORで結合され、対象のオブジェクトセットを洗練するために(括弧/インデントの使用を通じて)優先順位を組み込むこともできます。クエリの式が必要に応じて定義されたら、OKをクリックすると、式がPCB Rules and Constraints Editorダイアログのクエリ領域に読み込まれます。
PCB Rules and Constraints Editorダイアログでクエリ式が提示される際、それぞれ式の開始と終了に追加の開き括弧と閉じ括弧が追加されることに注意してください。
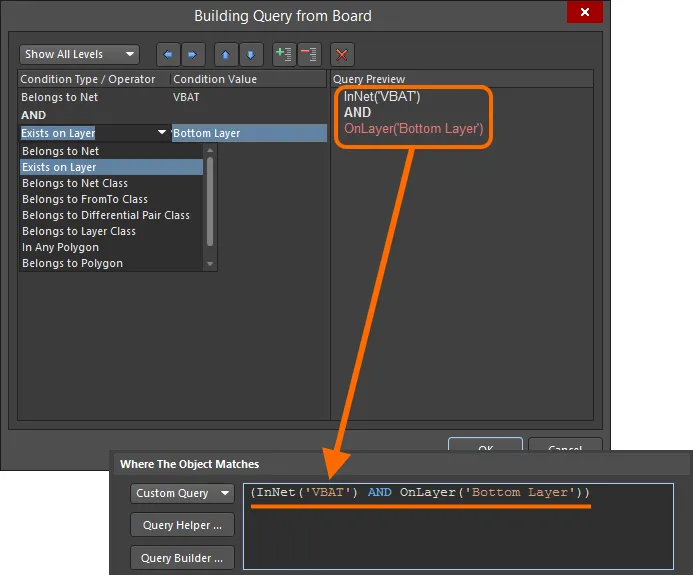
一連の条件文を通じて論理的なクエリ式を構築するために、クエリ ビルダーを使用します。
クエリ ヘルパーを使用してルールをスコーピングする
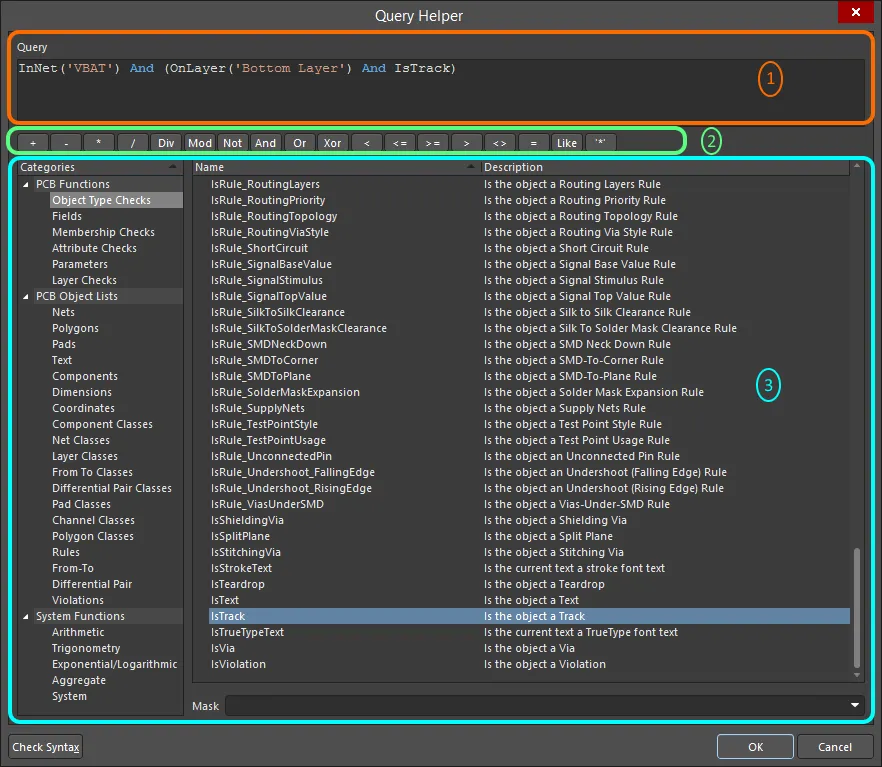
カスタムクエリオプションを有効にした後、 ボタンをクリックして、 Query Helperダイアログにアクセスします。基盤となるクエリエンジンはPCB設計を分析し、利用可能なすべてのオブジェクトとクエリで使用するための一般的なキーワードをリストアップします。
クエリヘルパーを使用することはかなり直感的です、特に以下の画像に示されているように、3つの明確なエリアに分けて考えるとさらにそうです:
複雑なクエリがクエリヘルパーを使用して定義された例。
これらのエリアは以下の通りです:
- Query Region – ダイアログのこの領域を使用して、問合せ式を作成します。ルール範囲に対して現在有効な式は、ダイアログにアクセスしたときに、デフォルトでこのリージョンで使用可能になります。領域内で直接入力できます。可能なキーワードまたはオブジェクトの状況依存の「プロンプトリスト」が補助として表示されます。
- Operators – ダイアログのこの領域には、式を作成するときに使用するさまざまな算術演算子と論理演算子があります。ボタンをクリックすると、その演算子が、上のQuery領域のクエリ式内の現在のカーソル位置に追加されます。
- Categories, Keywords and Objects – ダイアログのこの領域では、使用可能な PCB 関数、PCB オブジェクト・リスト、およびシステム関数にアクセスでき、照会式の作成に使用できます。これら 3 つの領域内のサブカテゴリをクリックすると、右側の領域内の対応するキーワードまたはオブジェクトの一覧が表示されます。クエリ文字列で使用するキーワードまたはオブジェクトを見つけ、そのエントリをダブルクリックします。エントリは、上記の Query 領域のクエリ式内の現在のカーソル位置に挿入されます。
 ボタン(ダイアログの左下)を使用して、式が文法的に正しいかどうかを確認します。クエリの式が必要に応じて定義された後、OKをクリックすると、式がPCB Rules and Constraints Editorダイアログのクエリ領域に読み込まれます。
Query Helperダイアログを使用してクエリを構築する際、利用可能なリストの中のキーワードをクリックして
F1を押すと、その特定のキーワードに関するドキュメントにアクセスできます。これは、
クエリ言語リファレンス内で行われます。
クエリ式演算子の優先順位
この領域を離れる前に、論理クエリ式で使用される演算子の優先順位について見ておく価値があります。この知識がなければ、式は必要なオブジェクトを対象としないかもしれません。
括弧は、さまざまな演算子に対して定義された優先順位の中で最も高い優先順位を持ち、ソフトウェアによってクエリがどのように解釈されるかを決定します(ユーザーが括弧を提供していない場合)。この優先順位の順序は、最高から最低まで以下の通りです:
- 括弧
- Not
- ^, *, /, Div, Mod, And
- +, -, Or, Xor
- =, <>, <, >, <=, >=
- &&, ||
この優先順位は、Pascal系言語で使用されるものと似ています。曖昧さは、左から右へと作業することで解決されます。括弧は内側から外側へと評価され、同じレベルは左から右へと評価されます。
クエリが正しく解釈されない可能性がどんなに小さくても、括弧を使用することを強くお勧めします。括弧をたっぷり使うことで疑問が取り除かれ、結果として得られるクエリが他の人にとって読みやすくなります。
ルールの優先順位付け
ルールを定義し管理するプロセスを簡素化するために、広範な要件をカバーする一般的なルールを定義し、その後、特定の状況で特定のルールでこれらを上書きするという考え方があります。これを可能にするためには、同じタイプの複数のルールがオブジェクトを対象としている場合にどのルールを使用するかを示すために、ルールを優先順位付けすることができる必要があります。
たとえば、ボード上で最も一般的に使用される配線幅を指定するには、ボード上のすべてのネットに適用される単一のルールを定義します。このルールは、同じタイプの別のルールを追加することで、特定のネット(またはそのためのネットのクラス)に対して上書きすることができますが、優先度が高くなければなりません。
別の例としては、はんだマスクの要件があります。ここでは、ボード上のすべてのパッドとビアを対象とする1つのマスクルールを定義し、それを特定のフットプリント種類のパッドに対して上書きすることができます。このフットプリント固有のルールは、必要に応じてそのフットプリント内の特定のパッドに対してさらに上書きすることができます。
ルールを管理する上で重要な側面は、すべての優先度が適切に設定されていることを確認することです。新しいルールが作成されると、デフォルトで最高優先度になります。 Prioritiesボタンを使用して、PCB Rules and Constraints Editorダイアログの下部にあるルール優先度の編集ダイアログで優先度を設定します。

Edit Rule Priorities ダイアログでルールの優先順位を変更します。
最初に、ダイアログでは現在PCB Rules and Constraints Editorダイアログで選択されているルールタイプのすべてのルールインスタンスがリストされます。Rule Typeフィールドを使用してルールタイプを変更し、そのタイプに定義されている特定のルールをリストします。定義されたルールは、現在の優先順位に従ってリストされます - 1(最高優先度)から順に下がります。ルールエントリを選択し、Increase PriorityボタンとDecrease Priorityボタンを使用して、それぞれ優先順位の順序で上または下に移動します。
既に1つ以上の既存のルールを含むルールタイプに新しいルールを追加する場合、優先度は1(つまり、最高優先度)に設定されます。
同じタイプの複数のルールを設定できます。設計オブジェクトが同じ範囲を持つ複数のルールによってカバーされる場合があります。この場合、競合が存在します。すべての競合は優先順位の設定によって解決されます。システムは最高優先順位から最低優先順位までのルールを通過し、チェックされているオブジェクトに一致するスコープ式を持つ最初のルールを選択します。ただし、一つの例外があります。
複数のマッチした長さの設計ルールがオブジェクトに適用される場合、すべてのルールがそれらのオブジェクトに適用されます。
既存のルールの変更
もちろん、ルールはいつでも変更可能です。実際、最終的な動作ルールセットに到達するには、ここかしこでいくつかの重要な改良が関わってきます。通常、これにはスコーピングが含まれ、対象の設計オブジェクトが必要に応じてそれぞれのルールによって「選択」されていることを確認します。PCB Rules and Constraints Editorダイアログで既存のルールを選択し、そのスコーピングと制約属性を必要に応じて変更してください。
既存のルール定義に加えられた変更は、フォルダーツリーペインと適用される要約リストの両方で強調表示されます。そのようなエントリーは、ルール名が太字になり、名前の右側にアスタリスクが表示されることで区別されます。アスタリスクは、新しく作成されたルール(太字でアスタリスクなしで表示される)ではなく、既存のルールが変更されたことを反映するために使用されます。
既存のルールが変更された例。変更を示すためにアスタリスクが使用され、ルール名が太字になっています。
特定のルールタイプに新しいルールが作成されると、自動的に優先度1が与えられます。そのタイプの他のルールが存在する場合、それらの優先度はそれに応じて1つ下げられます(低下します)。それらは、スコープ/制約レベルで具体的に変更されていなくても、変更されたとみなされます。そのため、そのタイプの既存のすべてのルールは、変更された状態(太字でアスタリスク付き)で表示されます。
無効なルールのフラグ付け
システムによってルールが無効と検出された場合 - 例えば、スコーピングクエリ式に問題があるか、許可されていない制約の値がある場合 - そのルールは無効としてフラグが立てられます。そのようなルールは、PCB Rules and Constraints Editorダイアログ内の左側のルールツリーと、ルールが表示される任意のサマリービュー(ルールカテゴリまたはルールタイプ)で赤くハイライトされます。さらに、ルールタイプとルールカテゴリのテキストも左側のルールツリー内で赤く表示されます。したがって、無効なルールを含むルールツリーのエリアを折りたたんでいる場合でも、階層の上位レベルでそれについて警告されます。ダイアログを閉じようとすると、警告メッセージも表示されます。

無効な設計ルールをシステムがフラグする例、この場合は誤ったスコープクエリ式です。
ルールの無効化
ソフトウェアのPCBエディターのルール主導の環境では、ボードを成功裏に制約するためのかなり印象的で包括的なルールの配列を構築することは珍しくありません。途中で何らかの理由で、一部のルールを無効にしたい場合があります。たとえば、それらが問題のボードに適用されないか、Design Rule Checkerの負荷を軽減し(その結果としてパフォーマンスを向上させるために)、一時的に無効にする必要があるかもしれません。無効にすることは、将来再び必要になった場合のために、そのようなルールを保持する良い方法です。
ルールを無効にするには、PCB Rules and Constraints Editorダイアログの右側にある関連する要約リストの中で、そのルールに対応するEnableオプションを切り替えます。無効にされたルールは、'グレーアウト'表示されます。

無効にされたルールの例、要約リスト内で灰色のフォントで表示されます。
ルールは、
PCBルールと違反パネルから直接有効/無効にすることもできます。ルールに関連する
Onオプションを切り替えます。これは、
PCB Rules and Constraints Editorダイアログのルールの
Enableオプションに反映されます。
ルールの削除
PCB Rules and Constraints Editorダイアログ内で単一の設計ルールを削除するには:
- 左側のツリーを使用して必要な既存のルールに移動し、右クリックしてコンテキスト メニューからDelete Ruleを選択します。
- 左側のツリーで特定のルールタイプに移動し、右側の概要リストで削除するルールを選択します。次に、リストの下にある Delete Rule(s) ボタンをクリックします。
ルール名は、適用されていない削除であることを区別するために、太字の取り消し線で強調表示されます。
単一のルールを削除する。
- 特定の設計規則が不要になったが、将来再び使用される可能性がある場合は、削除するのではなく、単に無効にすることができます。これを行うには、PCB Rules and Constraints Editorダイアログの右側にある関連するサマリー リストの 1 つで、ルールに対応する Enableオプションを切り替えます。
- 概要リストビューから 1 回のアクションで複数のルールを削除できます。これを行うには、削除するルールを選択し(標準のShift+クリックおよびCtrl+クリックのショートカットがサポートされています)、リストの下にあるDelete Rule(s)ボタンをクリックします。
- デザインルールチェックシステムが機能するには、特定のルールが存在する必要があります。これらのルールの 1 つが削除されると (そのルールの種類が存在しないように)、自動的に再作成されます。詳しくは、デフォルトのデザインルールをご覧ください。
新しいPCBドキュメントが作成されると、多くのルールタイプにデフォルトルールが自動的に作成されます。同様に、あるルールタイプの特定のルールがすべて削除された場合、PCB Rules and Constraints Editorダイアログに次回アクセスしたときに、デフォルトルールが自動的に再追加されます。また、ダイアログの下部にあるCreate Default Rulesボタンをクリックすることで、デフォルトルールを再度作成することもできます。
ルールのエクスポートとインポート
デザインルールは、PCB Rules and Constraints Editorダイアログからエクスポートおよびインポートすることができます。これにより、異なるデザイン間でお気に入りのルール定義を保存および読み込むことができます。
- To export – ダイアログの左側にあるツリー内の任意の場所を右クリックし、Export Rulesを選択します。Choose Design Rule Typeダイアログが開き、エクスポートする設計規則を選択できます。開いたExport Rules to Fileダイアログで、.rul ファイルに名前を付けて場所を選択できます。エクスポートされたルールは、PCBルールファイル(
*.rul)に保存されます。
- To import – ダイアログの左側にあるツリー内の任意の場所を右クリックし、Import Rulesを選択します。Choose Design Rule Typeダイアログボックスが開き、インポートする設計規則を選択できます。開いたImport File ダイアログで、インポートする .rul ファイルを参照します。
インポート時に、選択したタイプのルールが既に存在する場合、インポート前に既存のルールをクリアするオプションが提供されます。Yesをクリックすると、そのタイプのすべての既存のルールが削除され、.rulファイル内のルールに置き換えられます。Noをクリックすると、既存のルールが保持されます。ただし、既存のルールとインポートされたルールが同じ名前の場合、インポートされたルールが既存のルールに上書きされます。
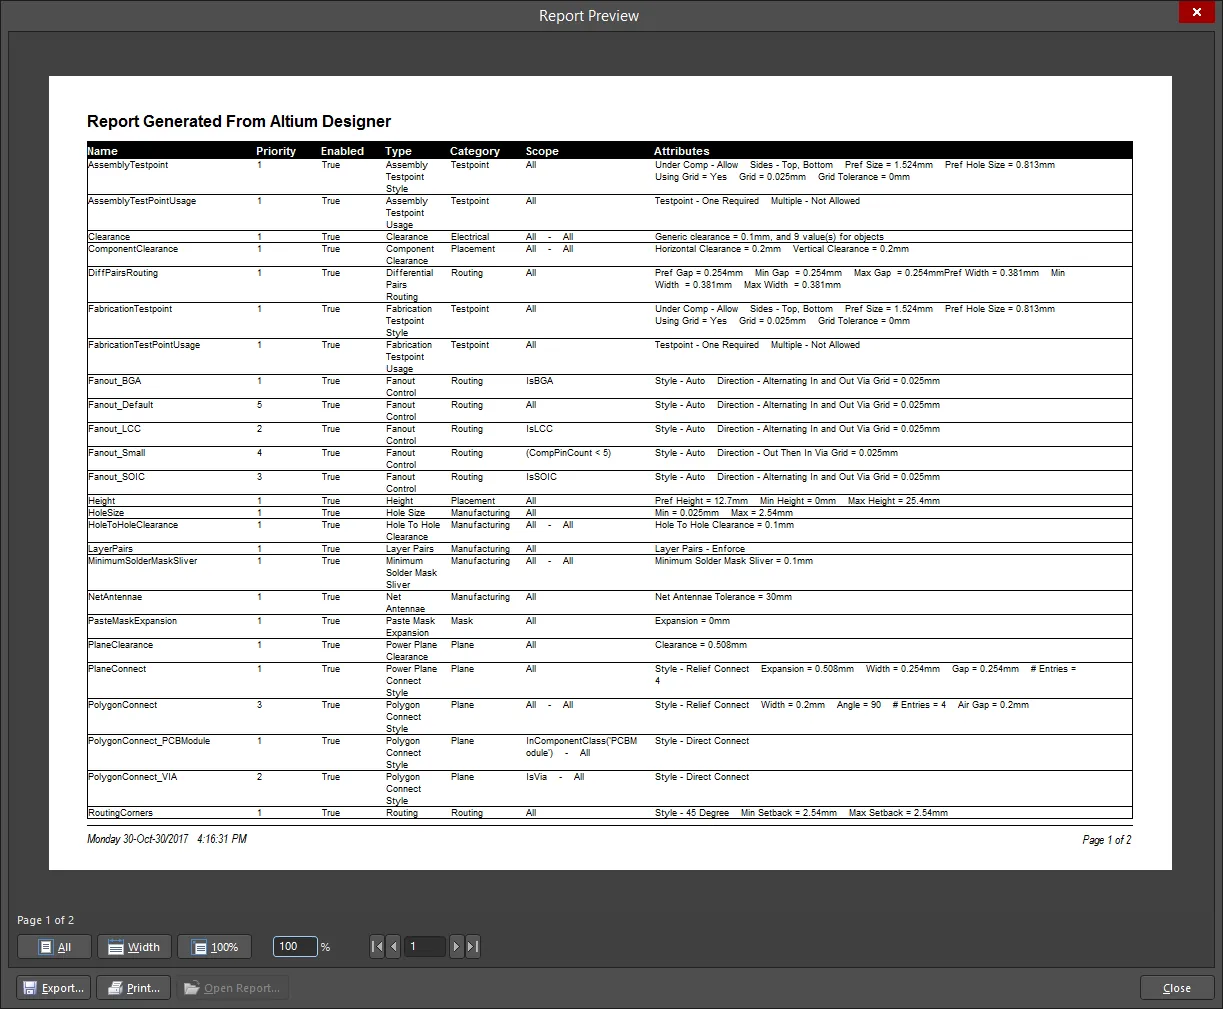
設計ルールレポート
PCB Rules and Constraints Editorダイアログ内から、現在定義されている設計ルールのレポートを生成することができます。レポートは、すべてのルールカテゴリ、特定のルールカテゴリ、または特定のルールタイプに対応することができます。レポートは次の方法で生成できます:
- 必要なサマリーリストにアクセスし、右クリックしてコンテキストメニューからReportコマンドを選択するか、リストの下にあるReportボタンをクリックします。
- フォルダツリー内の各エントリを右クリックし、コンテキストメニューからReportコマンドを選択します。
Report Previewダイアログが適切なレポートを読み込んだ状態で開きます。このダイアログを使用して、さまざまなページ/ズームコントロールを使用してレポートを検査し、最終的にファイルにエクスポートするか、印刷します。
回路図上でのルールの定義
PCBレイアウトに先立ち、設計制約(ルール)は、設定されたルールを持つパラメータセット指令を回路図ソースドキュメントに追加することで定義することができます。設計がPCBドキュメントに転送される際に作成される対応するPCB設計ルールの範囲は、パラメータが割り当てられたオブジェクトの性質によって決定されます。以下の表は、サポートされている回路図パラメータからPCBルール範囲へのオプションをまとめたものです。
| ルールを追加... |
元 |
PCBルールの範囲... |
| ワイヤー |
Propertiesパネル(選択したパラメータセットオブジェクトのプロパティを閲覧中)、Place » Directives » Parameter Setコマンドを使用してワイヤー上にパラメータセットオブジェクトを配置した後。 |
ネット |
| バス |
Propertiesパネル(選択したパラメータセットオブジェクトのプロパティを閲覧中)、Place » Directives » Parameter Setコマンドを使用してバス上にパラメータセットオブジェクトを配置した後。 |
ネットクラス |
| ハーネス |
Propertiesパネル(選択したパラメータセットオブジェクトのプロパティを閲覧中)、Place » Directives » Parameter Setコマンドを使用してハーネス上にパラメータセットオブジェクトを配置した後。 |
ネットクラス |
| ブランケット |
Propertiesパネル(選択したパラメータセットオブジェクトのプロパティを閲覧中)、Place » Directives » Parameter Setコマンドを使用してブランケットの端にパラメータセットオブジェクトを配置した後。ブランケットによってカバーされるすべてのネットのためのネットクラスを作成するために、必要な名前のクラスを含めます。これがルールの範囲に使用されます。 |
ネットクラス |
ルールベースのパラメータを追加する方法は、各ケースで同じです:
- ルールとしてパラメータを追加します。
- 使用するルールの種類を選択します。
- 選択したルール タイプの制約を構成します。
回路図上のオブジェクトに設計ルールパラメータを追加する際、各ルールパラメータには一意のIDが与えられます。同じIDがPCB上に作成される対応する設計ルールにも与えられます。この一意のIDにより、回路図またはPCB側でルールの制約を編集し、同期時に変更を反映させることができます。
ルール適用の確認
ボードデザインによっては、非常にシンプルから非常に複雑な範囲まで、多くのデザインルールを定義する必要があります。定義されたルールが確かに意図したオブジェクトを対象としているかを確認することは良い考えです。ルール定義の段階での注意は、誤ったルールスコーピングによって引き起こされる違反を追跡するための無駄な時間と労力を節約することができます。
ルールの範囲を検証する方法は基本的に2つあります。設計オブジェクトを選択して現在適用されているルールを調査するか、ルールを取り上げて(ソフトウェアの異なる場所で)どのオブジェクトがその範囲に含まれるかを観察します。
オブジェクトの視点から
現在の設計に配置された任意のオブジェクトについて、そのオブジェクトに適用される一項デザインルールに関する情報にすぐにアクセスできます。オブジェクトの上にカーソルを置き、右クリックしてからApplicable Unary Rulesを選択します。選択されたオブジェクトに適用される可能性のあるすべての定義済みデザインルールが分析され、適用可能な一項ルールダイアログにリストされます。
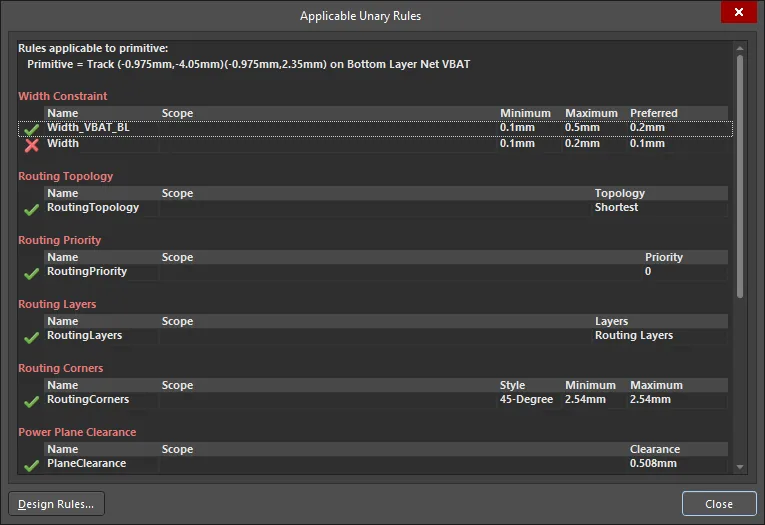
単一の設計オブジェクトに適用される設計ルール - 単項ルール。
ダイアログにリストされている各ルールの横には、チェック( )またはクロス(
 )が表示されます。チェックは、同じタイプの適用可能なルールの中で最も優先度の高いルールを示し、現在適用されているルールです。同じタイプの低優先度ルールは、適用可能であるものの最高優先度ルールではないため、現在適用されていないことを示すクロスが横に表示されます。
現在無効になっているが、オブジェクトに適用される規則がある場合、それらの規則は取り消し線が引かれ、横にはバツ印が表示されます。
同様に、設計内の2つの配置されたオブジェクトの間に適用されるバイナリ設計規則についても情報にアクセスできます。任意のオブジェクト上にカーソルを置き、右クリックしてからApplicable Binary Rulesを選択します。プロンプトに従って、設計内の2つのオブジェクトを選択します。Applicable Binary Rulesダイアログが開き、それらのオブジェクト間に適用されるすべてのバイナリ設計規則を表示します。
選択した2つのオブジェクトにバイナリ規則が適用されていない場合、バイナリバージョンのApplicable Rulesダイアログは開きません。
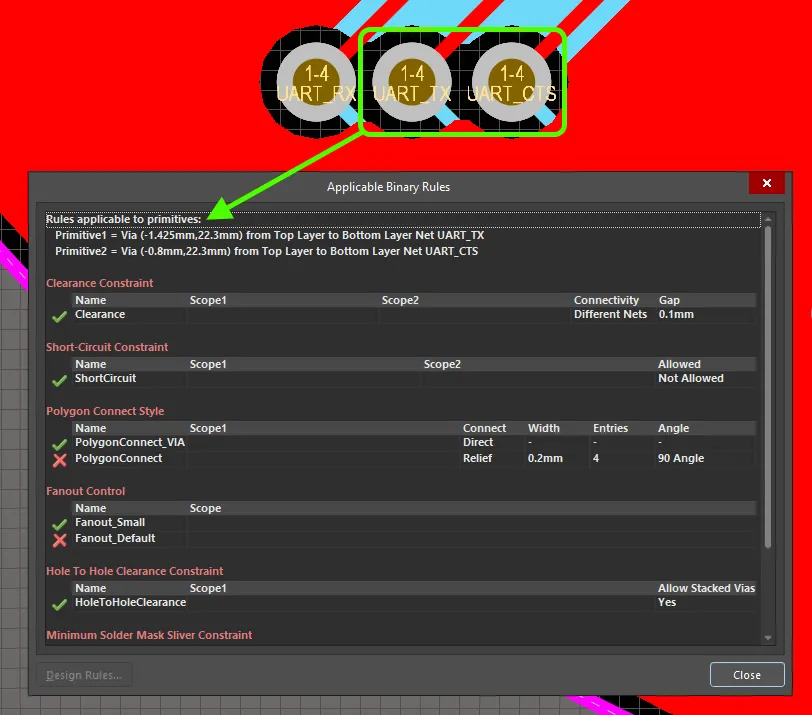
2つの例示的な設計オブジェクト間の適用可能な設計ルール - 二項ルール。
ルールの観点から
PCBルールと違反パネルを通じてのチェック
特定のルールがどのオブジェクトに適用されるかは、PCB Rules And Violationsパネルからもすぐに確認できます。このパネルには、設計に現在定義されているすべてのルールがリストされています。すべてのルールを表示することも、少なくとも1つのルールがアクティブな設計に定義されている場合に限り、ルールタイプごとに具体的に閲覧することもできます。 Rules領域のパネルで特定のルールをクリックすると、そのルールをフィルターの範囲として使用してフィルタリングが適用されます。ルールの範囲に該当する設計オブジェクトのみがフィルタリングされます。マスク(またはディム)ハイライト機能を使用することで、ルールによって対象とされる結果のオブジェクトをすぐに確認できます。
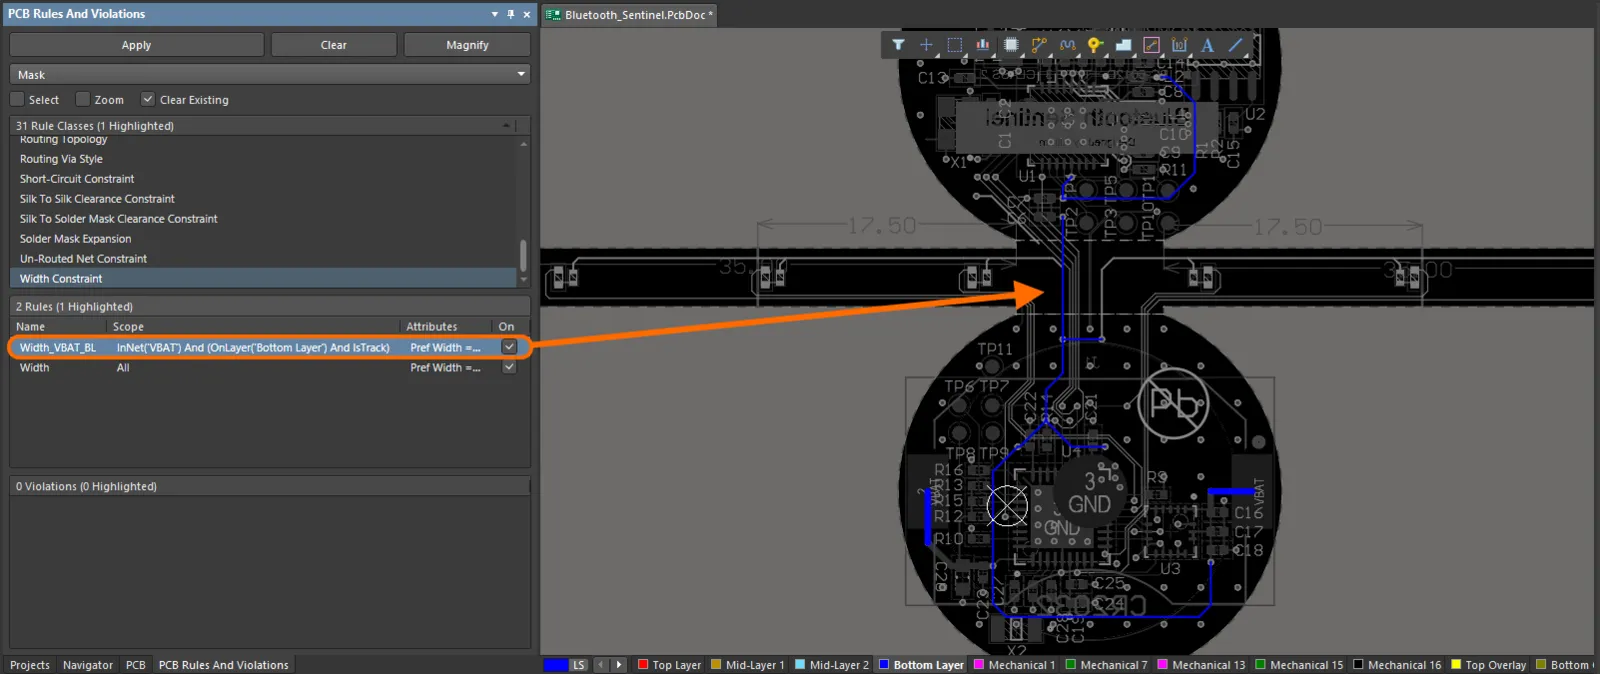
選択したルールがどのオブジェクトに適用されるかを確認するために、PCB ルールと違反パネルを使用する例。
ダイアログでハイライト方法が
Maskに設定されている場合、アクティブフィルターの範囲に含まれないオブジェクトに適用されるマスキングのレベルを、
View Configurationパネルの
View Optionsタブの
Mask and Dim Settingsセクションにある
Masked Objectsスライダーバーを使用して調整します。。ハイライト方法が
Dimに設定されている場合は、このパネルのセクションからも利用できる
Dimmed Objectsスライダーバーを使用して、アクティブフィルターの範囲に含まれないオブジェクトに適用される暗くするレベルを調整します。
PCB Rules And Violationsパネルを使用して、どのオブジェクトにルールが適用されるかを調査することは、ルールのスコープを作成する際に特に便利です。なぜなら、パネルから直接ルールを編集できるため、スコープによってキャプチャされる必要があるオブジェクトが得られるまでクエリを「調整」することができます。 ルールのスコープおよびその制約を編集するには、パネル内のルールのエントリをダブルクリックするか、右クリックしてコンテキストメニューからPropertiesを選択します。関連するEdit PCB Ruleダイアログが表示され、変更を加えることができます。
ダイアログとそのバナーテキストが提供するコントロールは、編集されている設計ルールのタイプによって異なります。
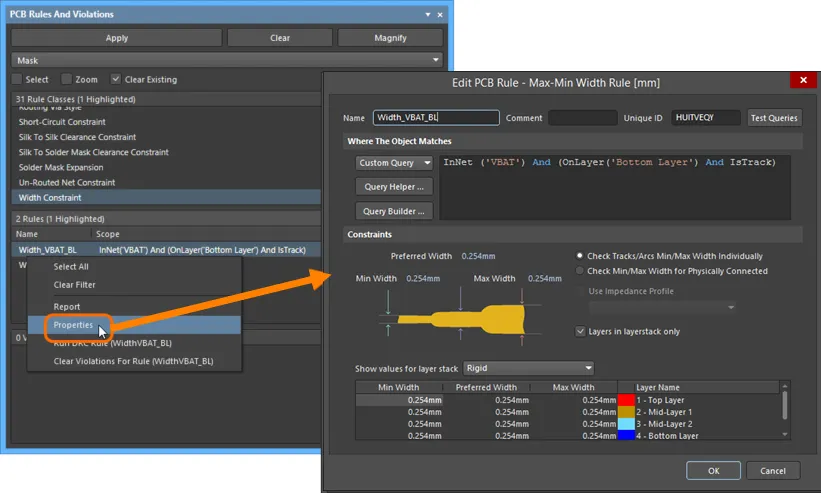
ルールはPCBルールと違反パネルから直接編集でき、その場でルールの範囲指定や制約をさらに洗練させることができます。
PCB Rules and Constraints Editorダイアログを通じてのチェック
PCB Rules and Constraints Editorダイアログには、特定のルールがどのオブジェクトに適用されるかをすぐに確認できるクエリテスト機能が含まれています。テストしたいルールのダイアログの右上にある ボタンをクリックします。Test Queries Resultダイアログが表示されます。このダイアログは、式の範囲に含まれるオブジェクトの数、現在のルールに適用可能なオブジェクトの数、および現在の優先度に基づいて適用可能なオブジェクトの数(複数の適用可能なルールが存在する場合)を反映しています。右側のリンクをクリックすることで、設計スペース内で直接、各ケースの適用可能なオブジェクトをすぐにフィルタリングして表示できます。Maskドロップダウンを使用して、PCBドキュメント内で影響を受けるオブジェクトを強調表示する方法としてNormal、Mask、またはDimを選択します。ズームがチェックされている場合、PCBドキュメントは影響を受けるコンポーネントにもズームインします。
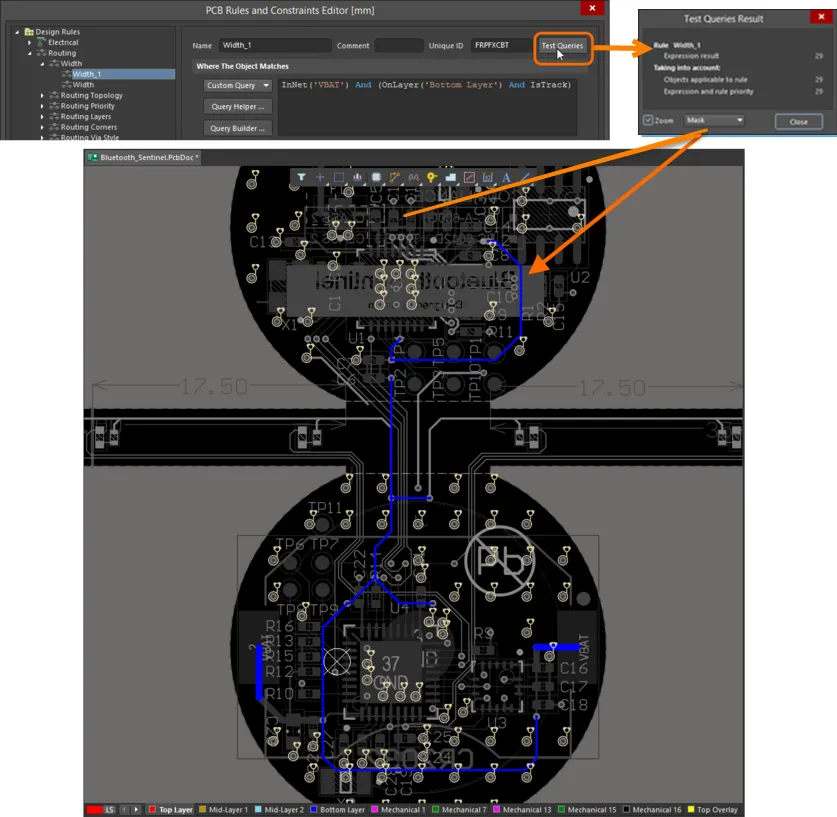
ルールのスコーピング式によってキャプチャされたオブジェクトを、テストクエリ機能を使用してすぐに確認できます

